
Guide To Clean Your Car Headlights
Posted by Hunt Parts on
Guide To Clean Your Car Headlights
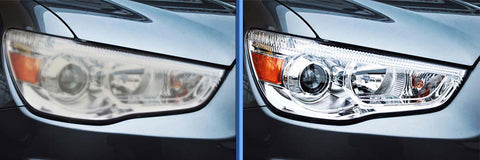
Cleaning car headlights is a crucial maintenance task that ensures optimal visibility and safety while driving, especially at night or during adverse weather conditions. Over time, headlights can accumulate dirt, grime, and oxidation, causing them to become hazy or cloudy, which reduces their effectiveness in illuminating the road.
How to Inspect Your Car Headlights?
Car headlights are essential for providing visibility during low-light conditions and ensuring safety on the road. To inspect your car headlights, Ensure the vehicle is parked on a level surface with the engine turned off and the parking brake engaged. Open the hood or access the headlight compartments from the front. Check the headlight lens for any cracks, chips, or discoloration. Damaged or cloudy lenses can reduce light output and should be replaced. If possible, remove the bulb and visually inspect it for any signs of damage, such as broken filaments or dark spots. Replace any faulty bulbs immediately. Wipe the lens with a soft cloth and a gentle cleaner specifically designed for headlights. This will improve the clarity of the lens and enhance light projection. Check the headlight alignment. The beams should be parallel to the ground and aligned symmetrically. Ensure all electrical connections to the headlight bulbs are secure and free from corrosion. Test the fog lights and high beams to ensure they are functioning correctly. If you find any significant issues with the headlights, such as malfunctioning bulbs, damaged lenses, or poor alignment, replace or repair them promptly. Regularly inspecting and maintaining your car's headlights will improve visibility, ensuring your safety and that of other road users. If you encounter persistent issues or are uncertain about the inspection process, consult a professional mechanic for a comprehensive assessment.
Washing the car headlights

Washing the car headlights is a crucial part of regular car maintenance that should not be overlooked. Over time, headlights can accumulate dirt, grime, and road debris, which can diminish their brightness and effectiveness. Here's a step-by-step guide on how to wash your car headlights effectively:
Prepare a bucket of warm soapy water, a soft sponge or microfiber cloth, headlight cleaner or toothpaste (for more stubborn stains), and clean water for rinsing. Dip the sponge or cloth into the soapy water and gently scrub the headlights, removing any loose dirt and debris. Be gentle to avoid scratching the lens. For more persistent stains or haze, apply a small amount of headlight cleaner or toothpaste to the surface. Use a clean, soft cloth to rub the cleaner in circular motions, gradually working out the stains. Once the cleaning is complete, rinse the headlights thoroughly with clean water to remove any residue from the cleaner or toothpaste. By regularly washing your car headlights, you can ensure optimal visibility while driving at night or during inclement weather. Clear and well-maintained headlights contribute to safer driving conditions and help you to see and be seen by other drivers on the road.
Sanding car Headlights

Sanding car headlights is a critical step in the headlight restoration process to remove haze, scratches, and other imperfections that develop over time due to exposure to the elements. Sanding helps to smooth the surface of the headlights, allowing for better light transmission and improved visibility while driving at night or in adverse weather conditions. Remove any dirt and grime. Dry the headlights completely before proceeding. Here's a step-by-step guide on how to sand car headlights properly:
Select the Right Sandpaper: Acquire a headlight restoration kit that includes sandpaper of varying grits. Typically, you'll need sandpaper with grits ranging from around 800 to 3000.
Wet Sanding: Wet sanding is the preferred method for headlight restoration. To begin, soak the sandpaper in clean water for a few minutes. Keeping the headlight surface and the sandpaper wet will help prevent excess friction and ensure a smoother finish.
Start with Coarse Grit: Begin sanding with the lowest grit sandpaper (e.g., 800 or 1000). Hold the sandpaper firmly and move it in a back-and-forth motion, making sure to cover the entire headlight surface evenly. This step is crucial to remove the top layer of the damaged plastic.
Progress to Finer Grits: After completing the initial sanding with the coarse grit, move on to the next higher grit (e.g., 1500, 2000, 3000). Repeat the sanding process with each finer grit, working towards a smoother finish and removing any scratches left by the previous grit.
Check Progress Regularly: Periodically stop sanding and wipe the headlight surface with a clean, damp cloth to check your progress. The surface should start to appear clearer as you remove the haze and imperfections.
Apply Polishing Compound on car to A Microfiber Cloth
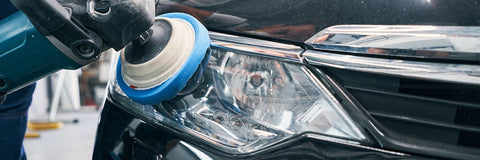
Applying a polishing compound to a microfiber cloth is a common technique used to restore the shine and luster of a car's paintwork. Polishing compounds are abrasive products designed to remove minor imperfections, light scratches, and swirl marks from the paint surface. Here's a step-by-step guide on how to apply polishing compound to a microfiber cloth and use it effectively on your car:
Select the Right Polishing Compound: There are various types of polishing compounds available, so choose one suitable for your car's paint and the level of imperfections you want to address. If you are unsure, seek advice from a car detailing professional or read product labels for guidance.
Preparation: Fold the microfiber cloth into a manageable size, ensuring you have a clean and soft surface to work with. You may also want to wear gloves to protect your hands during the application process.
Apply the Polishing Compound: Squeeze a small amount of the polishing compound onto the folded microfiber cloth. You don't need to use too much; a little goes a long way. Start with a small section of the car's paintwork, as you'll want to work on one area at a time for better control.
Buff the Paint Surface: Gently rub the polishing compound onto the paint surface using the microfiber cloth. Work in small circular motions and apply light to moderate pressure. The compound's abrasives will help remove imperfections and restore the paint's shine.
Check Progress: Periodically check the area you are polishing to gauge your progress. You should notice the improvement in the paint's appearance as the polishing compound works its magic.
Wipe Off Residue: Once you've finished polishing a section, use a clean and dry microfiber cloth to wipe off any residue left by the polishing compound. Check for any missed spots and repeat the process if necessary.
Continue Polishing: Move on to the next section of the car's paintwork and repeat the application and buffing process until you've covered the entire vehicle.
Final Touches: After polishing, consider applying a car wax or sealant to protect the newly restored paint and add an extra layer of shine and protection.
Remember to follow the manufacturer's instructions on the polishing compound label, and always work on small sections at a time to achieve the best results. Additionally, take your time and be patient during the process for a thorough and satisfying outcome.

In conclusion, cleaning car headlights is an essential maintenance task that should not be overlooked. Over time, headlights can accumulate dirt, grime, and oxidation, which can lead to reduced visibility and compromised safety while driving. By following a simple step-by-step process, one can effectively clean and restore the clarity of car headlights. Overall, regularly cleaning car headlights not only enhances visibility and safety while driving but also contributes to the overall aesthetics and condition of the vehicle. By dedicating some time to this important task, drivers can ensure they have a clear view of the road ahead and promote safer journeys for themselves and others on the road.